|
|
My Bicycle Trunk
First I'll show you what I carry in my trunk, what you see
is my basic payload, I carry all of this on every ride, plus a wallet, and
keys, and there still is plenty of room for lunch, snacks, etc. When we stop and
lock up our bikes, I un-mount the trunk, and toss in my cell phone , GPS, etc,
taking all the loose valuables with me, remember cycling shorts have no
pockets!
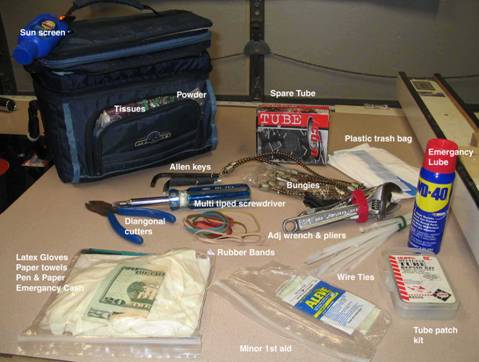
Most of the stuff is fairly obvious, but some of it bears explaining; latex
gloves take almost no space, and are a Godsend if you’ve got to touch the
chain, why worry about cleaning your hands if you don’t get them dirty in the
first place! The plastic trash bag,
(also takes no space), can act as a make-shift rain poncho, or a
tarp to sit on wet ground or benches, you can also waterproof your unused
layers of clothing from tire spray it you’ve bungeed them to your rack. The other
thing I’d like to point out is the
nylon wire ties; the old adage that you can fix anything with duct tape
gets a serious challenge from wire ties. I’ve used wire ties to secure broken
screws & spokes, and in a pinch you can use them in place of bungee cords,
as for the WD-40 it is really not a necessary item to carry, but it’s small,
and I’ve actually used it once for some noisy crank bearings.
Time for a disclaimer, I have nothing against commercially
purchased trunks, I just didn’t want to take the entire rack space available
with a full-sized trunk (plus I’m cheap). My trunk is a $4.97 soft-sided cooler from
WalMart, it has a flat zippered top pocket which is handy for maps, paper, plastic
bags, etc. There is also a zippered side pocket that is good for tissues, sun
screen, lip balm, etc. The main zippered compartment has a plastic stiffener
tub inside that provides structure, and a solid mounting base.
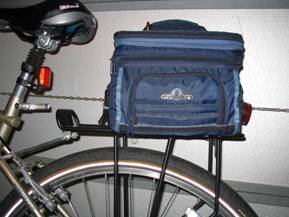 The picture to the left is my trunk mounted in the normal
position on my bike, the closer to the seat, the more stable the bike will be,
however, if we start out very early in the spring or fall, where we might need
to shed layers of clothes I can mount my trunk further back from the seat, to provide
additional “bungee space” for wind pants, sweatshirts, etc. The normal
position also permits me to easily swing my leg over the bike while still
providing a small "bundgee" area directly under my seat. The picture to the left is my trunk mounted in the normal
position on my bike, the closer to the seat, the more stable the bike will be,
however, if we start out very early in the spring or fall, where we might need
to shed layers of clothes I can mount my trunk further back from the seat, to provide
additional “bungee space” for wind pants, sweatshirts, etc. The normal
position also permits me to easily swing my leg over the bike while still
providing a small "bundgee" area directly under my seat.
The mounting was pretty straight forward, a couple of bolts through
the bottom of the plastic tub and cooler with a simple mounting plate
attached to my existing rear rack. The following pictures and text provide
more detail of the actual implementation with this specific cooler.
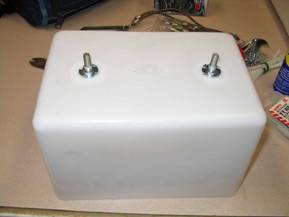
If you take a close look at the picture of the white plastic
tub (inverted) you’ll notice that the two bolts are held in place by T-Nuts, I bent the
spurs of the T-Nuts flat in a vice because they were not needed (they broke
 off, but that was ok too).
It isn’t necessary to keep the bolts in place with a
T-Nut, but if you want to take the trunk on & off it is really nice to have
the bolts held rigidly in place; this is a recent modification I
made after a lot of frustration every time I remounted the trunk. I’ll concede
the mounting advantage goes to some of the commercially produce trunks with
their fancy quick-connects, but with the recent T-nut solution I no longer find
mounting to be a hassle. off, but that was ok too).
It isn’t necessary to keep the bolts in place with a
T-Nut, but if you want to take the trunk on & off it is really nice to have
the bolts held rigidly in place; this is a recent modification I
made after a lot of frustration every time I remounted the trunk. I’ll concede
the mounting advantage goes to some of the commercially produce trunks with
their fancy quick-connects, but with the recent T-nut solution I no longer find
mounting to be a hassle.
If you look closely around the bolts you can see the shadow
of the oversized washers I used on the bolt heads, it is important to
distribute the stress as widely as possible or you’ll risk breaking the
plastic.You could also use a piece of hardboard as a sort "washer plate" inside
the tub as well if stressing the plastic is an issue.
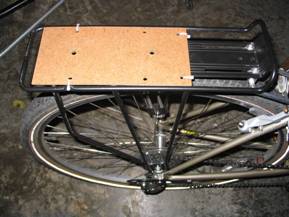 To mount my trunk I’ve constructed a simple mounting plate
out of ¼” hardboard, as you can see I secure the mounting plate to my rack with
nylon wire ties (you’ve got to love those things). The additional small holes
in the mounting plate allow me to reposition the plate, and hence the trunk, to
suit different conditions as mentioned earlier. The two large center holes
receive the bolts from the trunk which pass through the hardboard and are held
tight by a pair of wing nuts from underneath. This is where the previously
mentioned T-nuts are handy, To mount my trunk I’ve constructed a simple mounting plate
out of ¼” hardboard, as you can see I secure the mounting plate to my rack with
nylon wire ties (you’ve got to love those things). The additional small holes
in the mounting plate allow me to reposition the plate, and hence the trunk, to
suit different conditions as mentioned earlier. The two large center holes
receive the bolts from the trunk which pass through the hardboard and are held
tight by a pair of wing nuts from underneath. This is where the previously
mentioned T-nuts are handy, 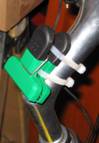 as they keep the
bolts stiff and allow you to quickly align and secure the wing nuts. as they keep the
bolts stiff and allow you to quickly align and secure the wing nuts.
The last picture is of my cue sheet holder, I know it has
nothing to do with my trunk, but I don’t know where else to tell you about it.
It is simply a potato chip bag clip attached (wire tied again) to the handle
bar stem, if you decide you like to ride cue sheet rides, this is a handy
little attachment to have.
Links to some other home built trunks I've come across
This one uses a Plastic Tub like those made by Rubbermaid
Here is your basic plastic Toolbox version secured with wire ties
A pannier type trunk made from a Mop Bucket
|